Getting Started
MCP Connector
Connect Yolando to your AI tools and put your own data to work. Once the connector is set up, you can ask about your AI discoverability, competitors, content, and recommendations — and get answers straight from your workspace.
About 2 minutes · Works with Claude, Claude Code, ChatGPT, and Codex
Before you start
A Yolando account with access to the workspace you want to use.
A Claude account on claude.ai or Claude Desktop. Custom connectors require a paid Claude plan.
Ability to add custom connectors (might require an admin)
Copy your server URL
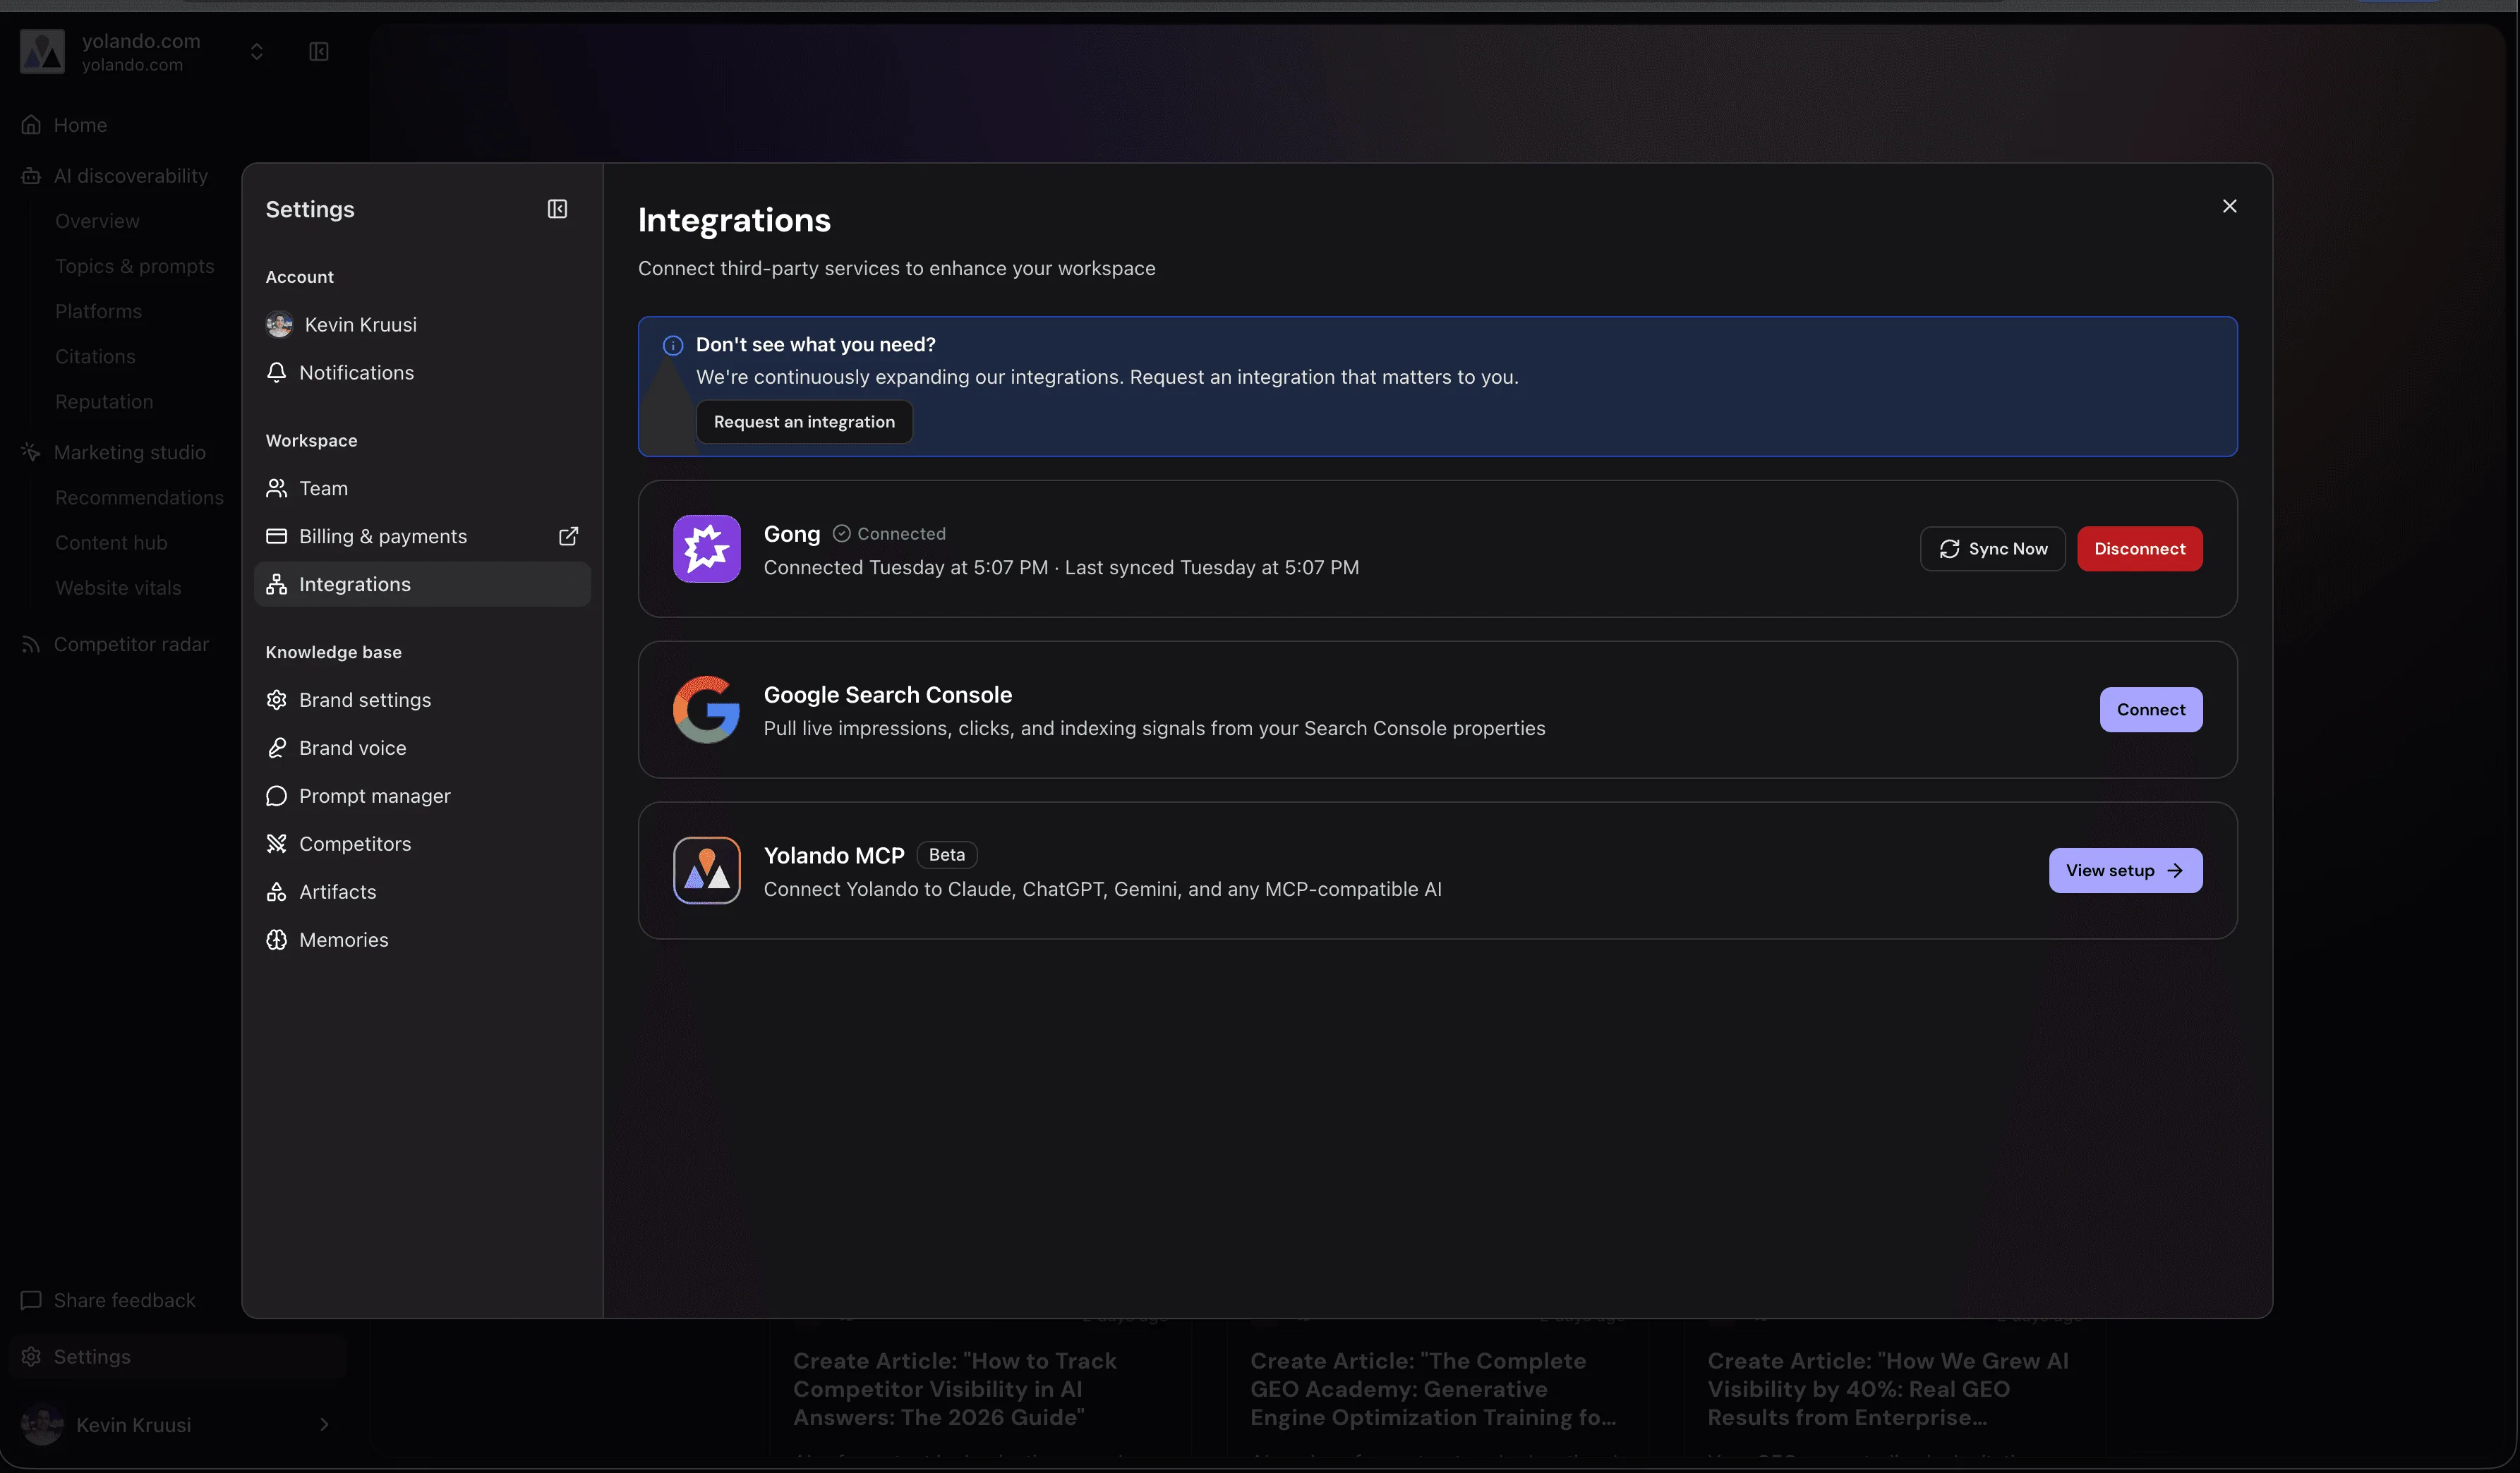
Open Integrations.
In your Yolando workspace, open Settings → Integrations from the Account menu. Every third-party connection lives here.Copy the server URL.
Find Yolando MCP (Beta) and click View setup. Copy the Server URL at the top of the dialog — that one value is all Claude needs.
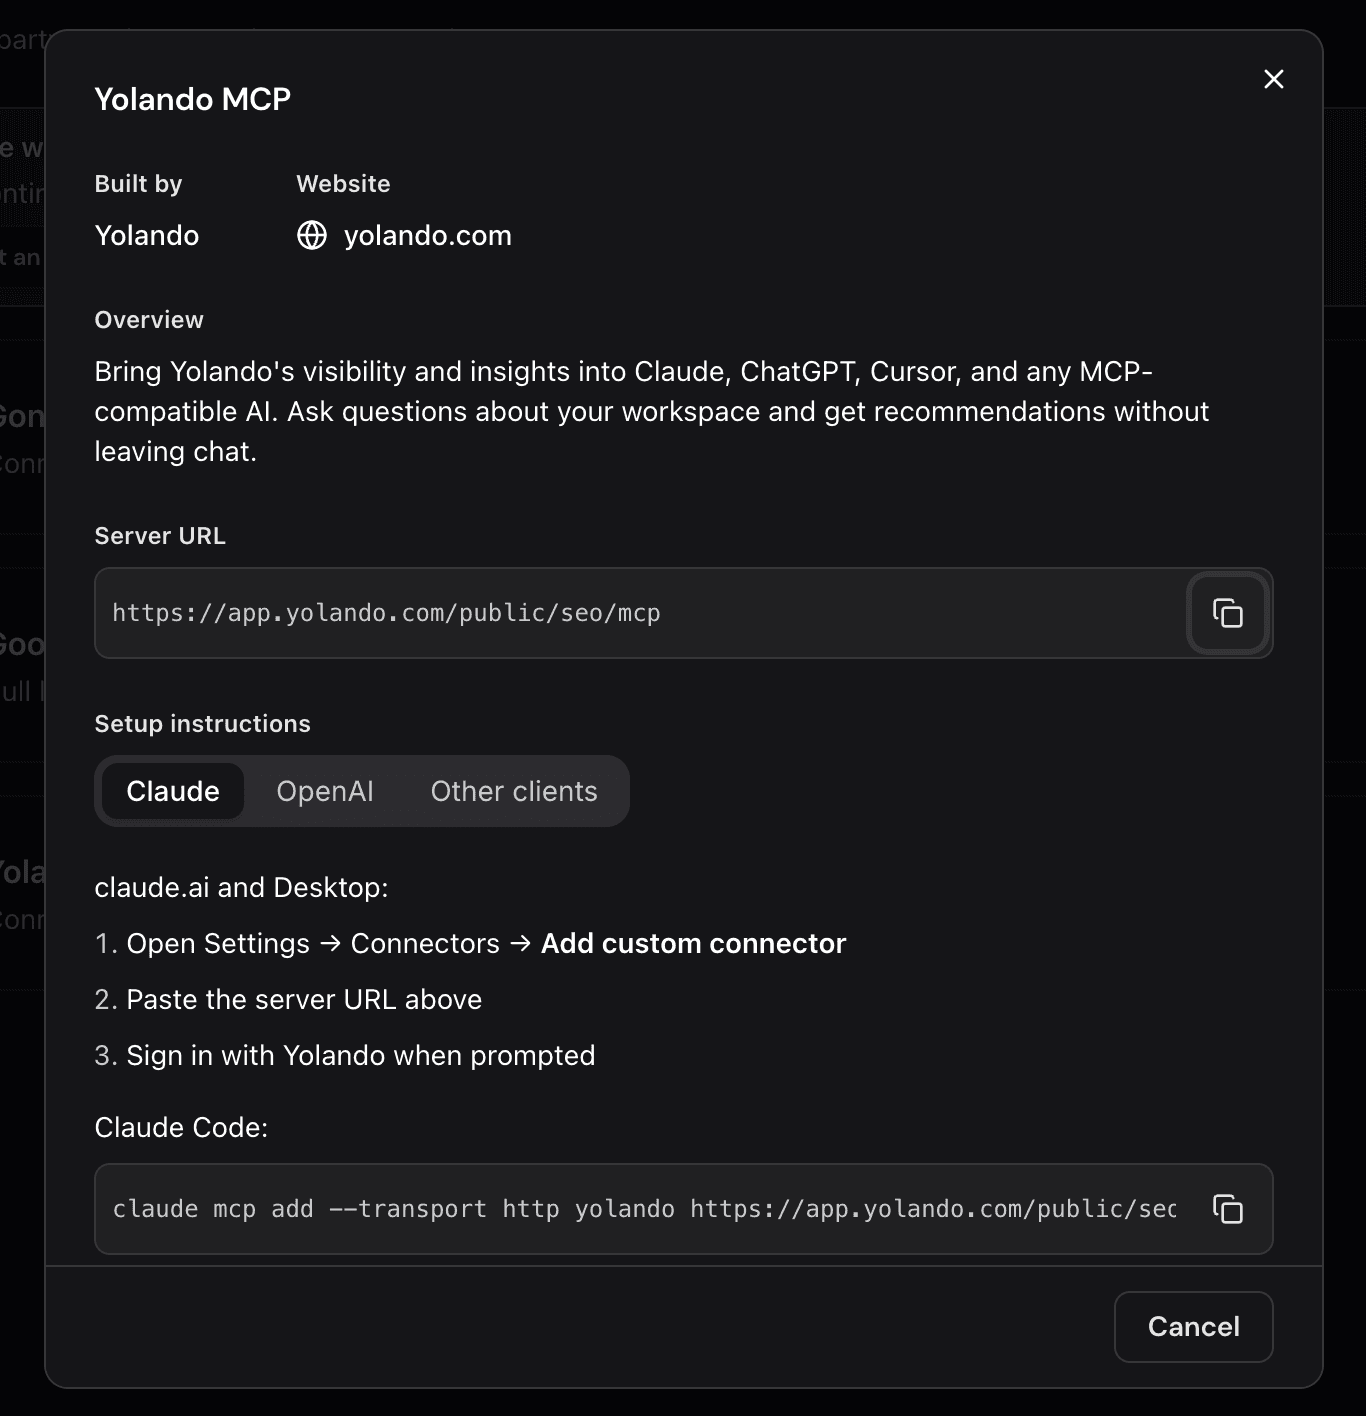
In Claude - Add the connector
Open Connectors.
In claude.ai or Claude Desktop, open Settings → Connectors, then click Customize to manage them.Add a custom connector.
Click the + at the top of the list and choose Add custom connector.Name it and paste the URL.
Name the connector Yolando and paste the server URL you copied. Click Add — you don’t need the advanced settings.Connect.
Open the new connector and click Connect. Claude hands you off to Yolando to authorize.Authorize.
Yolando asks to connect to Claude. Check that the destination is claude.ai and the requested access looks right, then click Allow access. Close the tab when it confirms.Try it in a chat.
Yolando is now available in Claude. Start a new chat, open the + menu, and confirm Yolando is toggled on. Ask for your AI discoverability overview to test it.
In Claude Code - Add the connector via CLI
Prefer the terminal? With Claude Code, you can add the same Yolando MCP server in a single command — no connector UI needed.
Open your terminal.
Open any project directory where you want Yolando available, or add it globally.Add the Yolando server.
Runclaude mcp add --transport http yolando YOUR_SERVER_URLusing the server URL you copied from Settings → Integrations → Yolando.Choose a scope (optional).
Add -s user to make Yolando available across all your projects instead of just the current one.Authenticate.
Start Claude Code and run/mcp, select Yolando, and complete the browser sign-in. Click Allow access to authorize the connection.Verify the connection.
Runclaude mcp listto confirm Yolando shows as connected, then ask for your AI discoverability overview to test it.
In ChatGPT - OpenAI
Yolando is a published app in ChatGPT. You install it from the plugin directory — no Developer mode, no server URL.
Sign in to ChatGPT and click Plugins in the sidebar.
Search for Yolando in the directory and open the listing.
Click Install plugin.
Sign in with your Yolando account if prompted, and approve access. You choose which scopes to grant and which workspaces the connection may act on.
In a new chat, mention Yolando by name — for example, "Ask Yolando how discoverable my brand is this month."
On a Business, Enterprise, or Edu workspace? An admin may need to enable the Yolando app first, under Workspace settings → Apps. If the install button is greyed out or says Disabled by admin, that's why.
Manual fallback. If the listing isn't available on your plan or in your region, you can still add Yolando as a custom connector with the server URL (https://app.yolando.com/public/seo/mcp). Current per-client steps are in Yolando under Settings → Integrations → Yolando MCP → View setup.
In Codex - Add the connector
Use this path to add Yolando to a Codex workflow that supports MCP servers.
Open your Codex environment.
Open the project or workspace where you want Yolando available as you work.Find MCP server settings.
Open the MCP, tools, or connector configuration area in Codex.Add Yolando as an HTTP MCP server.
Use the nameyolandoand the server URL you copied from Settings → Integrations → Yolando.Complete authorization.
When Codex opens the Yolando authorization screen, sign in, confirm the destination, and allow access.Confirm the tool is available.
Restart the Codex session if needed, then ask Codex to use Yolando to summarize your AI discoverability or pull workspace insights on demand.
Working across multiple workspaces
One connection covers every workspace you can access. You connect once — there’s no workspace picker during sign-in. The connection tracks your Yolando memberships automatically: join a workspace and it becomes available; leave one and it drops off. You never reconnect.
What the assistant can do in a given workspace depends on two things: your role in that workspace, and that workspace’s Yolando plan.
You don’t choose a workspace up front — the assistant does it for each request. It checks which workspaces you can reach, then targets one when it makes a call. If you have a single workspace, this happens automatically. If you have several and the assistant needs to know which you mean, just name it in your message — for example, “…for the Acme workspace.”
Last updated June 2026
What you can ask
Once Yolando is connected, try prompts like these to pull your data straight into the conversation:
“Give me my AI discoverability overview.”
“How am I cited across AI assistants?”
“Compare my visibility week over week.”
“Which sources mention my brand?”
Troubleshooting
Authorization didn’t finish
Reopen the Yolando connector and start the authorization again, then sign in with the Yolando account you want to use.
Which workspace does Claude see?
All of them. A single connection spans every workspace your Yolando account can access — you don’t switch accounts or reconnect to change workspace. Just tell the assistant which workspace you mean.
I don’t have the option to add a custom connector
Reach out to your IT team; your account is missing the necessary permission. Yolando is in the process of getting our MCP listed on the Anthropic & OpenAI directories.
Is my data safe?
Claude only reaches the workspace you authorize, and you can disconnect Yolando at any time from the connector settings.
Any other questions? Get in touch